31 October 2005

Anglo-Saxon Goldwork LOG Pouch Done

I finished off the Goldwork Anglo-Saxon LOG Pouch on the weekend. Just needed to be made up into a pouch. I forgot to put the hanging cord on, so I did a bit of a cheat and made the drawstrings extra long, they can use those to tie to belt. Only a small cheat as there are examples of pouches done like this in period.


I also got the Anglo-Saxon collar onto the frame. I am using my nice period slate frame for this. Still deciding on the colours, thanks to everyone who's given me feedback. I found some nice handspun wool on the weekend, it's very tempting to do it in those yarns. But I don't think I have enough and I don't want to have to wait for more to arrive.

29 October 2005

Not Much Sewing

Not much sewing going on, too hot. I did manage to watch 6 episodes of Jewel in the Crown. Can't wait to finish it off.

27 October 2005

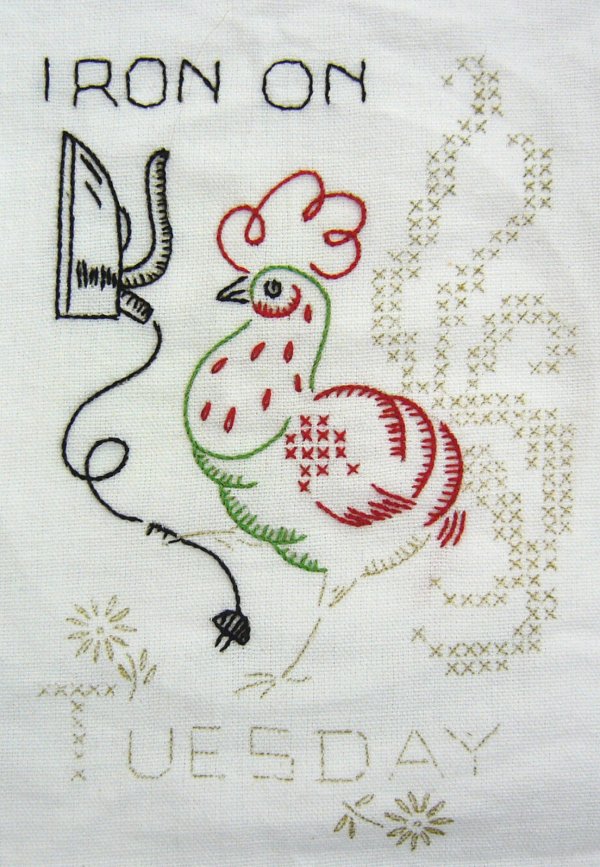
Tuesday Rooster Underway

Just a take to work project until I get the big projects on the frame over the weekend. This is the Tuesday Rooster with about 3 hours work.

26 October 2005

Anglo-Saxon Round Collar

This collar and cuff set will be for my nice green Anglo-Saxon under tunic. This goes under my other Anglo-Saxon tunic. The base fabric for this one is a nice chocolate brown. I am still deciding on colours for the embroidery. Instead of a key-hole neckline, I am going for plain round facing this time.

To transfer the pattern, I printed out the pattern in reverse (so that when transfered, the heart shaped leaves would be facing the right way!). Then enlarged it on the photocopier. Then I traced over the design on the photocopy with a chalk pencil. This was then placed face down on the fabric on a hard surface and patted down. This leaves enough of a pencil mark to then go over it again with another chalk pencil so that you have something to work with. Next step is to get it onto a frame.


So, what colours do you think would be the best combo? I am thinking of using two colours this time. Last time I just stuck with the nice mustard colour. That would work with this one as well, but I'd like to try something different. So vote for your two favourite colours by posting a comment. Just for info, the body of the tunic is a nice Kelly green and chocolate brown base for the collar facing.

25 October 2005

Sweetbag and Coif

I did about half an hour on the sweetbag. Finished on leaf. It really does look good once there is some colour on it. I think I will keep working it this way, outline then fill, rather than doing all the outline and then filling in. Really gotta knuckle down and workout the plaited braid stitch. I got it working a while back, but it's one of those stitches that if you don't do it regularly, you forget. Also, most of the problem is when you are just starting it off, once you are working it, it is dead easy.

I've pretty much decided the next big project will be the coif. I think I will use exactly the same motifs as the sweetbag, but because they will be worked in different stitches and styles, it will look totally different.


24 October 2005

Lazy Sunday Afternoon

Well, it was a very non-stitching weekend. I ended up spending most of Saturday shopping, got some nice food from the new markets in the Mall. Then we went tin-pin bowling on Saturday night.

Sunday was spent catching up on the house work. I planned to go to Sunday gathering to show off my shirt, but I got stuck watching a totally soppy Hallmark movie. There was eye candy, a simple, happy ending. Perfect Sunday afternoon fair. Then I watched The Pacifier, another no-brainer.

Got no stitching done. Not sure what to work on next. Thinking about keeping with the Elizbethan theme. Start working on my Sweetbag again and maybe a coif. Nightcaps are smaller but they are for guys, coif would be actually wearable.

21 October 2005

Blackwork Shirt Complete

It's finished!!! Yah, happy dance, can't wait to ware it! Just a matter of interlacing the sleeves to the body. Took about an hour. Below is a photo of the finished shirt. I will be getting some better photos done on the weekend. But this is to show you that it is indeed finished.

Before that is an image showing a close up of the interlacing used to join the pieces together. All the pieces of the shirt had their seams finished before I started embroidering. Then each piece, once the embroidery was done, was outlined in basic buttonhole. Then the pieces were just lined up and whip stitched together. The whip stitch goes through the loops created by the buttonhole stitch rather than through the fabric of the shirt. The catalogue entry says the original was joined with "interlaced insertion stitch", now in my opinion that is a category of stitch rather than a specific stitch. So in the interests of practicality ie I'm going to have to take it apart and sew it back together every time it's washed, I just used whip stitch. I believe that the reason for this type of joining is purely practical. You need to be able to take it apart in order to press the embroidery after washing. As well as practical, this seam treatment also acts as an additional form of decoration. Lia - does that make sense?


20 October 2005

Collar and Neck Gussets in Body

Got the neck gussets and collar on as well as the front facing. The neck gussets are fiddly little buggers! But they do make it a stronger garment. I must have been tired cause it took me two goes to get the collar on. I realised after it was all together that I should have made the front facing wider. It would've then covered the back of the embroidery when the shirt is worn open at the front. Ah well, I keep that on record for the next one!!

19 October 2005

Sleeves Finished

I was able to get the cuffs on both sleeves done. Machine stitched the front seam and then hand-stitched the inside seam. I was then able to sew the gussets in and finish off the sleeves. I ran out of silk thread, so I used some cotten perle I had on hand for the whip stitching. Probably better to use that than the silk anyway, as I am going to have to deconstruct the shirt each time I wash it. The perle will be easier to deal with and cheaper as well.

I am happy with how the black edging is turning out. It really does finish the shirt off well. I should be able to get the neck gussets, front opening facing and collar done tonight. Then that will just leave side gores and putting the sleeves on the body. Looks good for a weekend finish.


Pam - Unlike most of my work, this one is pretty much a straight copy based on the catalogue entry from the Warwickshire Museum. The info sent by the museum was great and I can't thank them enough for the help they gave me. More info on the Warwick Shirt page.

18 October 2005

Outling Body Piece

Nothing special, I started the buttonhole outlining on the body section of the shirt. I got about half of it done. I was so tired, I decided to have an early night. So I should get it finished tonight. Then tomorrow night I can start on the collar and cuffs.

17 October 2005

Outlining of Shirt Pieces

After a mild panic attack, the washing has worked. All of the pink transfer pencil is now out of the linen. It was touch and go, but a little bit of press wash stain remover got the last really tough bits of pencil out. Even in the edge seams where it was folded over into the seam. I washed and pressed all the pieces twice. After the second soak, quite a bit of black dye came out of the silk, but it didn't bleed into the fabric, so all is good. The linen comes up so nice when it's pressed.

I've started going around the edges of the various pieces. I did the two gussets and two sleeves last night. It will probably take a couple of nights to get the body piece done, but that's too be expected due to the size. So, with a bit of luck, I should be able to put it together on the weekend. I think it should only take me two or so hours to hand sew the sleeves, gussets and body together. I will have to time it for future reference because I think I am going to need to take it apart and reassemble each time I wash it. It will just be too hard to press the embroidery if it's not in flat pieces.

The only other thing I have to do is to make gussets for the neck, and for the small section that joins the body. The original doesn't have a facing for the front slit, but I am going to put one in, I think it will sit better if I do. Just hope I've got enough of the linen left. Also, after this weekends clean up, I hope I can find it!


Beth - Yes, I always use some sort of hoop or frame when I'm embroidering. If I was working with really thick wool, I probably wouldn't, as that would have enough body to hold, but I find it very difficult to work any finer fabric without a hoop or frame. But it's purely a matter of personal preference. I think my work distorts less because of the tension that a frame or hoop provides. I also find working in hand (ie without a hoop), very hard on my hands, they cramp up very easily.

Gina - Yes, I will definately be posting a picture of the finished item.

14 October 2005

Blackwork Shirt Embroidery Complete

Well, the day has finally arrived. I have finished the embroidery on the shirt. The next stage is to wash and press the panels a couple of times before they get sewn up. I can do this one of two ways, just traditional sewing together or I can do it like the original, which is to use insertion stitches to put it all together. While I am really keen to get it done, doing it the second, traditional way is really appealing to me at this stage. After 109 hours, whats another ten or so putting it together this way. I will have to do this after washing, because the silk tends to felt a bit (I've used similar finishings around the neck of a square necked chemise). So after they are washed and pressed (I am doing that to get all the shrinkage in the embroidery out of the way before I sew it together. Once it's together it will be hard to iron the embroidery. But once it's been washed its less of an issue) I can then go around the edges of all the pieces in buttonhole stitch. I will then join the pieces together with some sort of insertion stitch. Not sure what yet. I will have to do some research.

I decided not to work the back of the shirt. It would look better, but realistically, no one will see the back except for a small section at the back of my head and I'd much rather just get it finished at this stage. People will get the full impact from the front and that is done.

I am calling this project complete from the embroidery perspective. Although you could call the joining embroidery, but hey, I just want to call it finished!

11 October 2005

Transfer Techniques

There are a variety of ways to transfer designs onto fabric. One of my favourite ways is to use an iron on transfer pencil. These are very simple to use, all you need some tracing paper and a design. You basically trace the design onto the tracing paper using the transfer pencil. You then flip over the tracing paper and use an iron to transfer the design to your fabric. You need to be using a light coloured fabric for this to work, but it doesn't have to be super light coloured to work. Also, you have to be careful as this type of pencil requires washing to remove. So you either have to be sure you will cover the design with your sewing or do it on a fabric that can be washed.

This method is very handy if you are using the same design or motif multiple times. As you can usually get several impressions before you have to retrace the design.

I have used this method of pattern transfer on several of my projects, including the caul, Warwick Shirt, Anglo-Saxon Collar and Cuffs and my various largess projects.

I thought I'd also add how I deal with transfering designs to dark fabrics. This method isn't pretty or elegant but it works for me!! Basically, I work alot of my designs on computer or when I have free-handed a design I photocopy it. I then use chalk pencils of light colours and draw over the design. I then flip it to put the chalk side in contact with the fabric. This is all laid on a solid, flat surface. Then I basically just bash the hell out of it with my hand. This generally transfers enough of the design to the fabric that I then go over it directly with the chalk pencil. It's a variation on the traditional prick and pounce method, but without mucking around putting alot of small holes in something. This is the method I used with my Icelandic Cushion project and Lady Gro Pouch.

10 October 2005

Shirt Again

Did another few hours on the shirt last night. Up to 33 hours on the body. Will probably only get a couple of hours in tonight. But if I do that all week, I should be well on the way for a weekend finish of the embroidery.


NOTE: For Beth and Julie, I will do a post tomorrow about my transfer technique, need to get some photos etc together.

9 October 2005

Post Wedding BBQ

Went to Adam's Mum and Dad's for the post wedding BBQ. Hung out. Did some sewing. Got photos of wedding printed out on the way, showed them to everyone. Gave his cousins a lift to the airport, since it's just down the road from us. Settled down and managed some sewing.

8 October 2005

Sally's Wedding

Did a big post about the wedding, it got eaten by the Internet. Anyway, spent all day getting ready. It was a bit windy but the rain held off. Everything went off without a hitch. Adam's speech was great. Didn't get home to about midnight.

7 October 2005

Shirt Final Stages

Another few hours done. Up to about 25 hrs for the body of the shirt. I could probably get it done this weekend, but I've got a heap of housework and a wedding, so that will take care of most of Saturday and alot of Sunday. But I will have tonight, so that should be another 3 hours at least, so enough to do the other band, which will just leave the floral motifs (no peascods, yeah!) and the two bands on the shoulders. I will probably also do one row of motifs on the back, but they are smaller and different to the rest so that should only be another few hours. I think if I put in a big effort, there is a good chance that all the embroidery will be done by next weekend, which would mean I could get it washed and pressed a couple of times (to pre-shrink everything) before I then start putting it together.

Tonight will be Chinese food (Salt and Pepper Squid and Satay Chicken), followed by watching the cricket and sewing. It should be a good night, I feel like watching cricket. We actually won the first game, but I'm not surprised, when you mix players from five or more countries (for the World XI), you loose cohesion.

And to Julie, thanks for the comments and yes, the non-counted blackwork does come together pretty quickly. I'm up to 96 hours for the shirt so far, which is pretty close to my initial estimates. I think you get more bang for your buck with this style of blackwork and it's so much easier than counted work. If you make a mistake, you just add an new motif!! If your interested, there is my previous blackworked item of a caul.

5 October 2005

Back From War

War was fun. We had a full schedule of A and S classes, all the teachers showed up and there were students for every class. There was talk of plots against me for having the audacity to run A and S at Spring War, so I know I was doing something right!! ;-)

Didn't get any sewing done, I never sat down long enough. But everyone seemed to enjoy themselves so that was good.

Picture below is an update I didn't get a chance to do before I left. I am getting to final stages and I am really wanting this project done. It might even be worth the heat stroke to wear it at 12th Night!