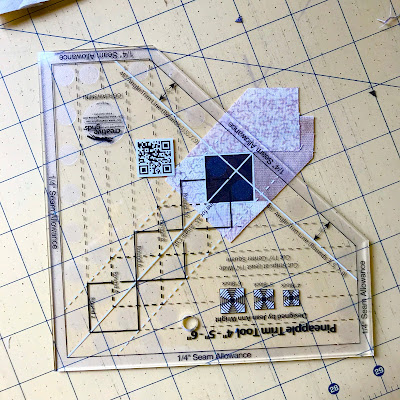
I'm generally not one for specific quilting rulers. However, I've been wanting to make a pineapple quilt for a while and I didn't want to do it using foundation paper piecing or having to use a normal ruler which would require doing maths (that is just not going to end well). So I had a look around and found the Creative Grids Pineapple Trim tool. It comes in two sizes standard (6", 8", 10") or mini (4", 5", 6"). I had plans for two quilts, so I bought each size.
Before I started I watched the videos (standard and mini) provided by Creative Grids on how to use the tools. I'd recommend watching the standard size one, even if you are getting the mini as I think it provides a better demo of the step by step procedures of using the tool. Missouri Start Quilts has an even longer, every single step video for the mini.
Photos above of completed 6" blocks.
I decided to work using the mini tool first up. It's pretty simple, you cut strips at least 1 1/4" wide and start by sewing these to a 1 1/2" central square (different starting sizes for the standard tool). It also gives you the measurements to pre-cut your pieces. I chose this options because it would reduce the trimming required during construction. It gave about 6 different lengths, but for simplicity sake, I rounded to 2", 3" and 4" strips. So if you've got alot of small scraps, this is a great tool for using them up. If you pre-cut your strips, that's pretty much all the maths required for using this tool. Cool!!
Once you've sewn the first round on, you follow the guidelines marked on the ruler and start to trim. All the lines are clearly marked and labelled!! I've got a couple of rulers where the markings aren't 100% clear and could really benefit from labels on the markings.
The pieces don't need to be the entire width of the previous piece. For safety sake, I did make mine overhang, but because I have a sewing guard on my 1/4" foot, it made adding the two opposite sides for each round difficult. So for the first few rounds in future, I will trim them (with scissor, a good in front of the tv job) so they line up with the perpendicular straight edge, allowing them to run smoothly through my 1/4" foot.
Before pressing seams
After pressing seams
I'm always a big fan of pressing seams as I go when constructing a block. I just gives you a much neater finish. For this block, it is vital to set and press the seams for each round before trimming and continuing onto the next round of sewing. Here you can see the before and after of setting the seams. It really does make a big difference.
Overall, I'm extremely happy with the tool. They aren't cheap - $40 AU each. But they really make what is a complicated block very easily, a real no brainer. As long as you are careful and use the right trimming guide (you use one side of the tool for even rounds and the other side for odd), you can't go wrong. But be warned, the first thing I would do starting this project is put a new blade in my rotary cutter (which I did), between cutting the strips and the trimming, you do alot of blade work on this block.
And even though the tool is easy and fast to use, this block does take time. I'm going to be working in batches, as it would be a real pain to try and do a quilt sized project in one go using the mini tool (even using the largest 6" size).
Stay tuned, I plan to make a test block (only one this time) for the other project I had in mind. This is the one that actually made me want to make a pineapple block quilt.
And, I really should've tested out the colour scheme in EQ8 before I started sewing. I want to make sure the secondary circle pattern is distinct, which the brown does. But I love pink! But maybe a bit too much and the circle isn't as clear? Yep, the pink gives a sort of cross pattern, whereas the brown gives a circle. Phew, I'd hate to have made those first six blocks for nothing!


0 comments:
Post a Comment